
One of the main advantages of smartphone photography is the easy access to all the latest computational photography tools. These tools, often in the form of apps, and sometimes directly built into the smartphone camera itself enable the photographer to enhance images well beyond the capabilities of the hardware. In a modern smartphone these technologies perform minor miracles in taking what would be average to poor image and video quality and raising that bar up to near-DSLR levels. But a major question begs to be asked; how can you use these same computational photography technologies to improve your DSLR photos and why would you want to?

DSLR photo, normal edits, no computational photography enhancements.

Same shot after computational depth-of-field has been applied.
To get started, let’s talk about why you would want to leverage computational photography technologies for your DSLR (or mirrorless, more on this later) photos in the first place. Bottom line, tools such as these give you a huge edge in being able to take a decent photo and turn it around into something really epic. Currently most DSLR (e.g. Nikon & Canon) manufacturers do not include these types of computational photography technologies into their cameras. Same with the majority of the mirrorless camera manufacturers with the sole exception of maybe Sony. Until recently, DSLR and mirrorless shooters had to sit out nothing short of a major revolution in image enhancement technologies!
In the past you needed to get a lot of things right during the DSLR/mirrorless capture process in order to maximize your chances for an amazing image once you pulled it into Lightroom or Photoshop for post-processing. Now, in the world of computational photography you can concentrate on getting your composition right at the point of capture, leaving the heavy lifting for things like depth-of-field control and advanced lighting for the post-processing phase. Another strong reason to explore the use of these technologies in your DSLR photography is how it can help make up for not having the most expensive gear. Do you really need that f1.4 lens when you can create that same quality bokeh computationally? A tough question to be sure, especially if you are a total pixel-peeper like me. Quality matters, and the last thing any photographer wants is technology that reduces image quality. Therefore, my current recommendation is for DSLR users to view computational photography tools as something that’s worth trying but are likely a few years away from being something you could count on in a commercial photo shoot. For now, while the results shown here are amazing, you can’t always count on the technology to work for all types of images.

Before, notice her hair is sharp and you can see a flyout to the right. Taken using an Olympus OMD E-M5 II.

After, when computational photography changes have been applied but the masking blurred her hair and the flyout is gonzo.
While it sure feels like the computational photography revolution is leaving traditional DSLR (and mirrorless) camera platforms behind there are simple and easy ways you can leverage the latest software to get back into the game. While it is easy to leverage computation photography tricks directly on your smartphone during the photo capture process, on older camera platforms all the heavy lifting will need to be done in the post-processing phase of your workflow using various software apps. The new capabilities found in this software is nothing short of amazing. You can control depth-of-field, perform advanced lighting effects, and even modify the sky to completely change the feel of your shots.
The Software You Need
Personally, I have found that while you can find some computational photography tools on the desktop, they are somewhat behind what is possible using mobile apps such as Focus, Enlight, and Google Snapseed (iOS/Android). That said, Luminar and Lightroom have been adding new artificial intelligence-powered computational photography features recently so definitely keep your eye on what develops over the next few years. I think this is a huge opportunity for both the mobile and desktop software developers to cash in on what is likely the biggest leap in photography technology in quite some time.
My “DSLR/Mirrorless” Computational Photography Workflow
Being an iPhone guy, I typically use Apple’s photos ecosystem as my central repository for my image processing workflow. This makes it easy to integrate various mobile apps right alongside classic desktop applications like Lightroom and Photoshop. For the sake of speed and convenience, I typically import my photos directly onto either my iPhone or iPad, leveraging Apple’s ability to seamlessly backup my imports to the cloud while also allowing me immediate on-the-go access to my photos and/or video. Once the images have been imported, the real fun begins.

Using Focos to directly modify depth-of-field.

Using Focos to change the scene lighting using a virtual softbox.
I won’t dig into any of the traditional image enhancement methods, as those are well documented and that’s not why you are here, but I will mention that I usually perform those basic image adjustments before jumping into the computational enhancements. For this example, I am going to use Focos, which is an amazing app that lets you adjust depth-of-field and lighting of your photos. Initially Focos was the first app that allowed iPhone 7 Plus users to adjust portrait mode photo’s “background blur”. Now, there are several apps including Apple’s own built-in editor that allow you to modify depth-of-field for iPhone portrait mode photos. Why we are talking about Focos in this post is thanks to a newer feature it now has where you can open any photo and Focos will attempt to generate a depth map for it. I won’t mix words here; this is simply awesome. Being able to open up a photo that I took on my old Nikon D7000 and adjust the DOF/bokeh is just incredible. In the example below, I am able to take a wedding photo from being “just ok” to looking much better with only a single adjustment. Taking things a bit further, I am also able to adjust the lighting to better expose the subject(s) without impacting other areas of the photo as if I was adjusting the lighting when the shot was taken.
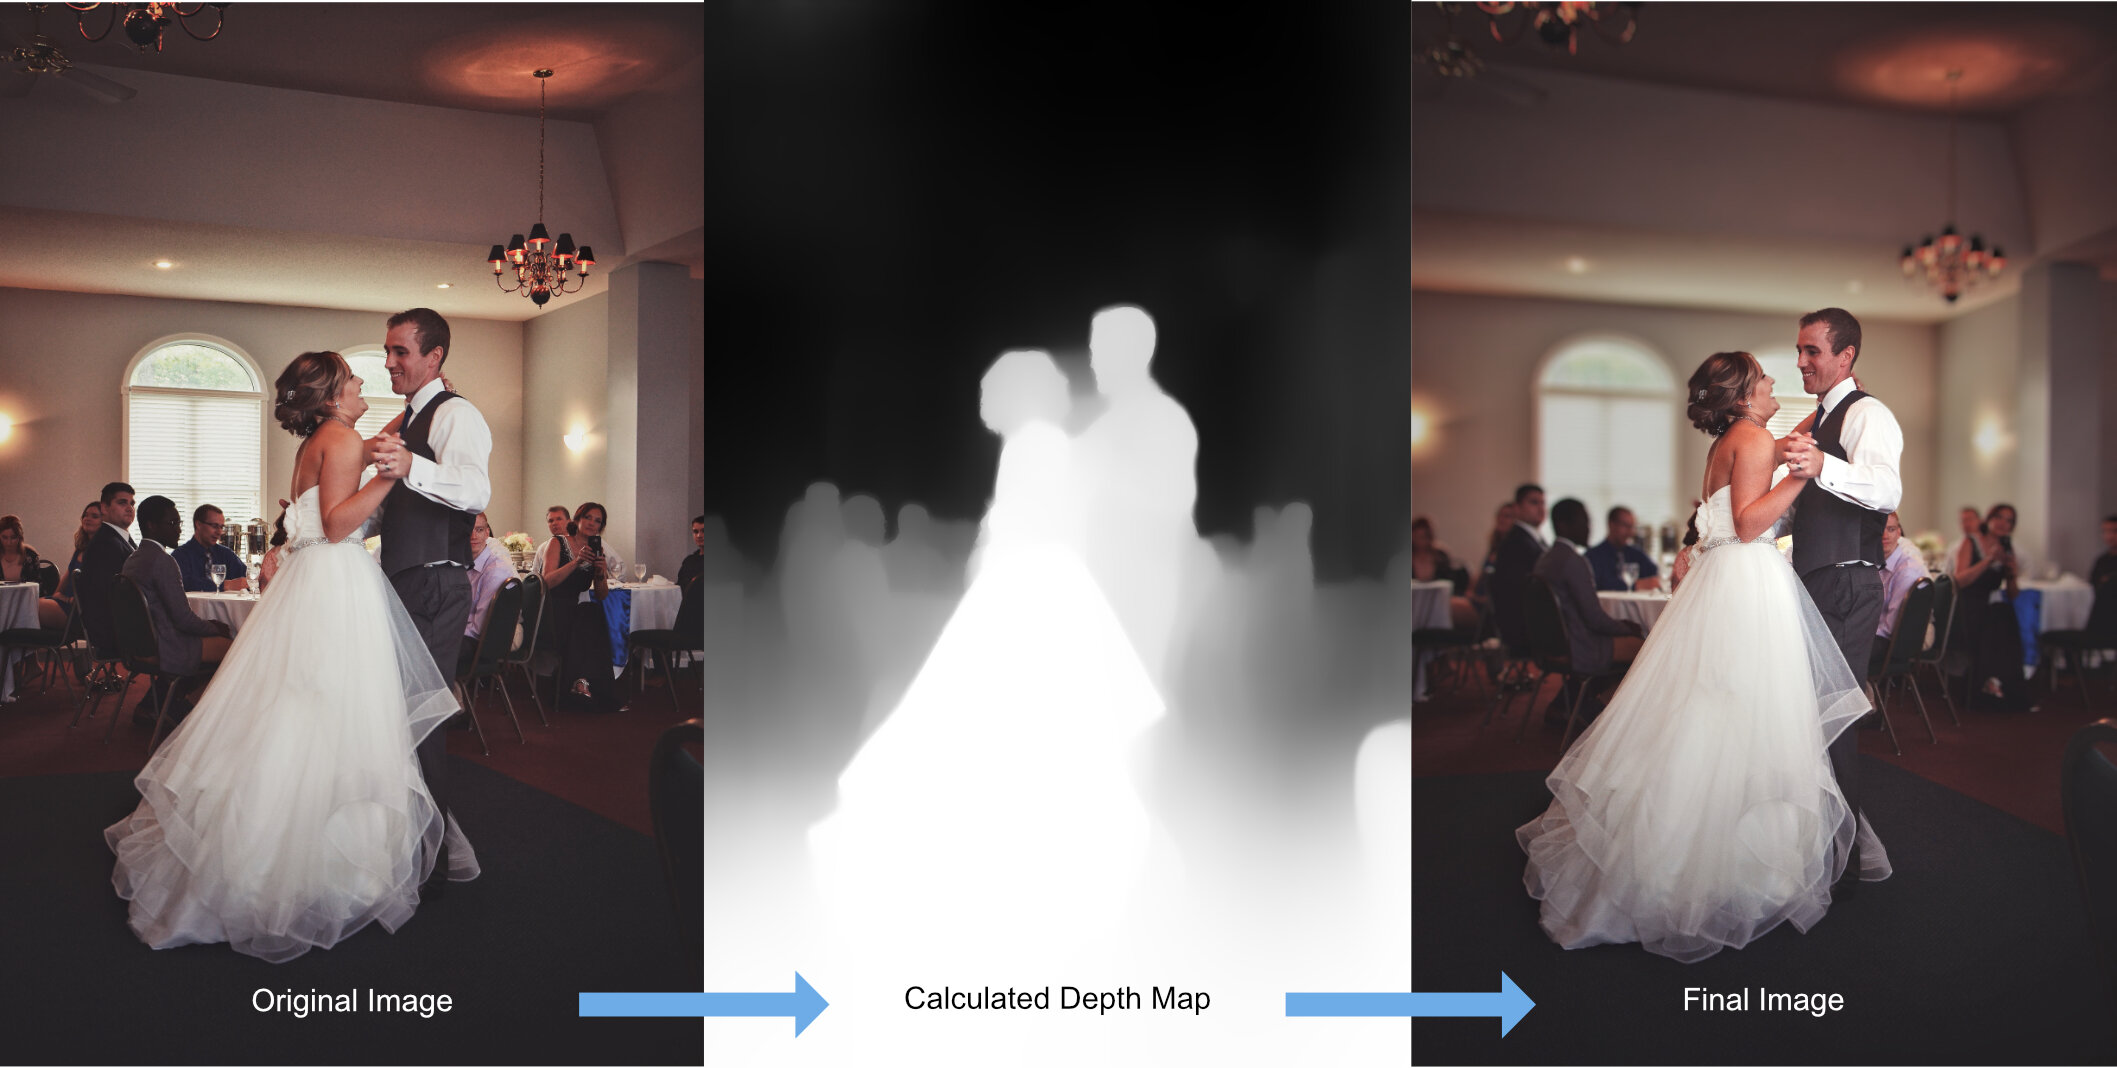
Original image shot on a Nikon D7000 DSLR and then processed in Focos.
The huge impact that this capability has is when you apply it to older photos where you never had the option for a narrower depth-of-field, either due to lighting conditions or the limitations of the hardware used to capture the photo (e.g. slow kit lens).
Putting the wedding photo example aside, let’s take a look at few more shots where I was able to create a much nicer looking photo by modifying the depth-of-field long after (in some cases, years) the shot was taken.
We’ve seen how you can take DSLR (or mirrorless!) photos and breath life back into them using an app like Focos to modify the depth-of-field and how that can dramatically improve an image. Let’s move on now to see how you can perform much more dramatic image enhancements using computation photography tricks such as sky replacement, facial enhancements, and quick look at the new landscape of computational filters.
The Sky is not the Limit
When I initially discovered some of the early implementations of sky replacement I was not impressed. Most of the software I tried was clumsy and generated sky replacements that looked decidedly artificial. Thankfully, the current generation of apps that perform sky replacements are leveraging machine learning to perform the masking which does a much better job in correctly separating sky from everything else. Combined with accurate color modeling this process produces results that sometimes can even fool experts. My go-to app for this example is Enlight Quickshot as it does a decent job while keeping the process super-simple. In the example below, you can see how the choice of sky makes quite a bit of a difference in how convincing the replacement is. More complex applications such as Luminar do a better job but require additional work to get right.

Sky replacement using Enlight Quickshot combined with depth-of-field adjustments in Focos.
Conclusion
If you are a serious photographer and you have not been paying much attention to what has been going on in the smartphone-dominated world of computational photography, then you might want to take look at some of these tools. While I would definitely say that not all of these features are ready for prime time, there are several aspects which might be extremely useful, even for those who primarily shoot using an older DSLR or Mirrorless camera system. Personally, I was really captivated with how I could go back in time to mine old photos that were shot years ago, turning them into exciting shots that had a completely new feel. If you use any of these tools mentioned in this post, or you find new ones, let me know in the comments!